House2Home - Real Stories
House
3
min read
02 Jul 2020
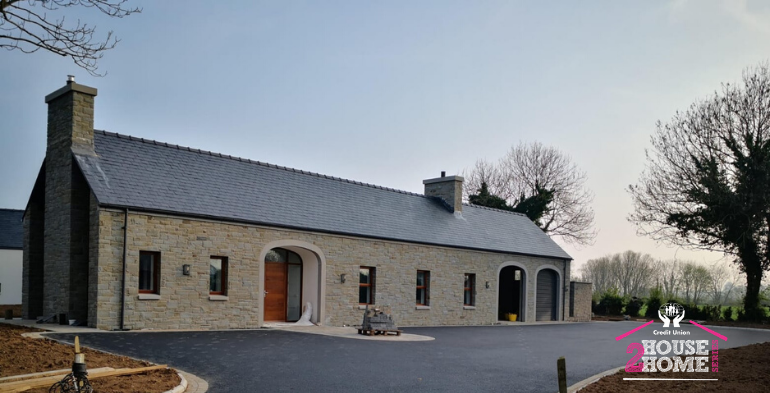
Home Improvements, Renovations, designing a house? How do you get it all done? As part of our House2Home Series, we spoke to Alison Murphy, who has just completed a self-build project with her family. In our latest blog, Alison talks us through the process of self-building and how she turned ideas of her family’s dream house into a forever home.
Sourcing the build site:
We were lucky in that my husband’s family owned some land. Our challenge was to secure planning permission at a time when Planning NI were restricting new builds in rural areas. There is a high demand for sites with planning permission in our local area, at the height of the housing market it was not uncommon to see those for sale going for six-figure sums. Planning restrictions and approval are dealt with by local councils, some more stringent than others in their application of the rules. It took almost two years to secure planning approval, and a further three before we were ready to build.
Planning Permission approval:
With any planning application, you firstly have to demonstrate how you meet the criteria to build in that location before you will be considered for approval. Our architect had recommended that we secure outline planning permission to begin with, to ensure building on the site in question would be possible, before we went to the expense of having a house designed. Once outline permission had been granted for a single-storey dwelling, we submitted an updated house design with our full planning application.
Approval of the full planning application and house design is a crucial milestone – in addition to securing approval for the house design from the Planning Office (which in itself can prove challenging if the house design is different from typical dwellings), those living within the vicinity of the proposed build have an opportunity to lodge concerns or objections, which could impact the approval decision.
In addition to planning permission, you also need to seek building control approval. They are concerned with the structural design of the house, and will similarly have their own subjective opinions on the design.
Next steps:
Our next step was … nothing! With planning permission granted, we had a five-year window to dig the foundations for the house. With a young family to run after, the priorities had shifted, so we got on with the day-to-day madness with the intention of starting to build when the children were a little bigger.
Fast forward a couple of years, and the time had come to break ground. A big decision for us at that point was whether we should manage the project entirely ourselves, or use a contractor to oversee the build. Having given the plans to a quantity surveyor, we were provided with a ‘bill of quantities’, which gave us a realistic idea of how much the build was going to cost – always good to be sitting down when you first read that!
The cheaper option was to manage the project ourselves, but with no expertise in building, and work and home commitments, we decided to use a contractor who would be responsible not just for managing the build, but for providing the various tradesmen for plumbing, electrics, joinery and so on, as and when they were needed.
Our house build went out to tender with a number of contractors, who came back with a cost and timeline to deliver the project.
Timelines & targets:
Using a contractor meant that the timeline for delivery was clearly outlined. As with any building project, certain elements were delayed or pushed back, depending on tradesmen, the installation of services and utilities, and of course the weather. A clear advantage for us in using the contractor was their access to tradesmen. If we had have managed the build ourselves, those expected delays would have undoubtedly been more challenging with scheduling tradesmen to turn up when they needed to.
Overall the project timeline given by the contractor was 9 months, which felt quite ambitious! The build went 3weeks over schedule, but in part this was due to additional works that were added to the project after we’d started, such as the laying tarmac at the front of the house.
Designing the dream house:
The overall layout of the house was relatively easy to decide upon. Given the location of our site, we were restricted to a single storey build. Any concerns I’d had about building a bungalow disappeared in that first meeting with our Architect, who sketched what would turn out to be our final layout within the first ten minutes! What was much more challenging was deciding upon the finishes and overall style of the exterior of the house, and finding a balance between contemporary and traditional that appealed to both of us.
The style of the house evolved even throughout the planning application process, and we revised the plans again just before building commenced. Having had the opportunity to live in different houses, our concept of what would work for us definitely changed from the beginning. We’d also started a family in that five-year period, which further influenced the use of space – for example, design version one didn’t have a toy room…..with three young children, our final house design would not have been without one!
We were fortunate in that some friends of ours began building their home whilst we were in the initial stages of planning, giving us a backstage pass to the process overall, which undoubtedly influenced our own build decisions
Frustrations:
I’d say the hardest part is the wait. Depending on the demand for planning approval at any given time, you could be waiting for months before your application process even begins to be considered. And as there always is with applications such as these, changes to the design have to be put back into the queue to be reviewed and approved.
Budgeting & planning:
Getting a Quantity Surveyor to provide a bill of quantities proved invaluable for us in planning a budget for the build. With a realistic cost of materials and labour, we made some initial changes to materials to save money, and were able to prioritise some features over others.
Our budget for the structural build of the project was agreed with the contractors, and for the most part we were able to stick to those costings. There were deviations along the way, but overall we remained within the budget we’d set for ourselves.
For fixtures and fittings, such as the kitchen and bathrooms, which were outside of the contractors costings, we set an initial budget of what we hoped to spend, but ultimately this was a lot harder to adhere to! The huge range of options available brings with it a considerable range of pricing.
Whilst using a contractor added an additional cost to the build, it also saved us significant amounts of time and money in terms of managing tradesmen and scheduling of works. Before the work began, we asked them to provide us with a monthly project schedule, which detailed the timeline of every element of the build. Based on this, they were able to give us an estimated breakdown of costs – their work was invoiced monthly for payment, and included materials delivered and installed – which was so helpful in managing the budget.
The cost isn’t spread evenly over the duration of the project, it is dependent on works carried out within the invoicing period, and with milestones such as the windows fitted came much larger monthly costs. Having visibility of this before we began allowed us to better manage the budget.
Is there anything you would do differently second time around?
Overall we were really happy with the house build process. We learnt an awful lot, but were lucky to have a great foreman on site, and a very hands-on architect to assist us along the way. Even with that, mistakes were made. One thing we’d do differently would be to have initial design conversations with a kitchen and bathroom supplier before building begins. We had initial ideas for both from the architects drawings, but in both cases, talking to the experts in the kitchen and bathroom showrooms resulted in a number of changes to the design and layout of each of those spaces, which meant that pipes had to be moved, and an internal wall had to be repositioned. Had we had those design conversations before works began, those adjustments could have been easily made and not created additional work/cost.
Visualisation of the plans as an actual physical space is quite difficult – what does a 4m x 5m room actually feel like as a living space? To give perspective on room sizes, I compared those on the plan to the sizes of the rooms in the house we were living in at the time. If we were doing this again, we’d have applied the same logic to the garage space and mapped out the space with a car inside it, which would’ve definitely increased it’s dimensions!
This story has been told as part of our House2Home series delving into tips tricks trends and real stories Find out more about our new series here